Improve your Decision LM: for humans
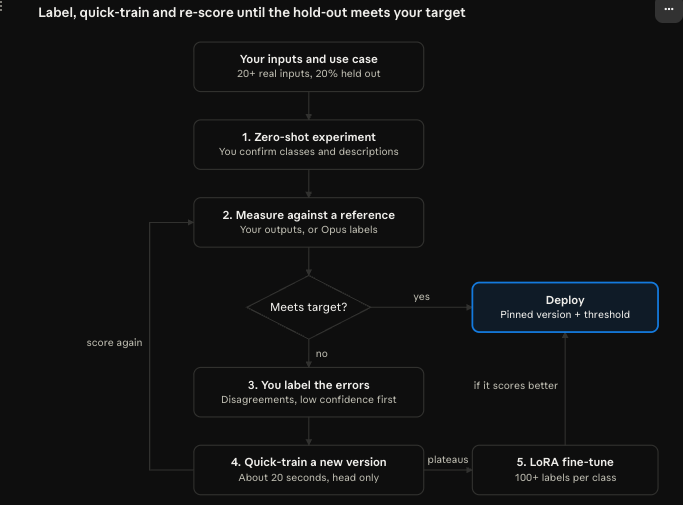
Start with a zero-shot model, compare it to a reference, label its mistakes, and quick-train until it hits your target. Move to a LoRA fine-tune if quick-training stops helping. Real inputs help, but you can start with none, and labeled outputs are optional.
Prefer to hand this to an agent? See For coding agents. For the overview, see Iteratively improve your Decision LM.
What you need
- An Emissary API key
- One sentence on the decision the model makes
- Whatever examples you have: inputs, outputs, both, or none
- A target metric, such as accuracy or precision. If you don't have one, Claude Code can suggest one for you to confirm
This loop covers binary classification, multi-class classification, and regression. If one input can carry several labels at once (multi-label), go straight to a LoRA fine-tune.
Before you start: a hold-out set
You need a ruler to measure your Decision LM against, called a hold-out set. It doesn't have to be perfect, and you can start from nothing:
| What you have | What to do |
|---|---|
| Nothing | Have an AI write inputs and labels from your use case. Skim and approve the sample. |
| Inputs, but no outputs | Have an AI label them (with Opus), and spot-check the result. |
| A few examples (fewer than 20) | Have an AI write more in the same style, and approve them. |
| 20 or more inputs and outputs | Use them as they are. |
If you already have a separate hold-out set, use it in every case. You score on the hold-out and never train on it. Write training data on top of it, never from it.
A hold-out also wears out. Once you've written training data to fix its errors, its score is optimistic. Before you deploy, score the final version on 20 or more fresh inputs. Made-up examples are a weaker test than real ones, so swap in real data as soon as you have it.
The steps
1. Zero-shot
Write a class name and a description for each class, saying what belongs, what doesn't, and how to break ties. Then create the experiment in the Playground, or through the API.
The descriptions are the model's only instructions at this stage, so review the full table before you create the experiment. Save the experiment id straight away, because the API can't list experiments.
import os, requests

exp = requests.post(
    "https://api.withemissary.com/v1/experiments",
    headers={"Content-Type": "application/json", "X-API-Key": os.environ["EMISSARY_API_KEY"]},
    json={
        "name": "support-triage",
        "mode": "decision",
        "classes": [
            {"name": "billing", "description": "Charges, invoices, refunds or payment methods. A bug on the billing page is bug."},
            {"name": "bug", "description": "Something in the product is broken or behaves wrongly."},
            {"name": "feature_request", "description": "Asks for something the product doesn't do yet."},
        ],
    },
).json()

print(exp["id"])  # your <experiment_id>; zero-shot starts at version 0.0.0
2. Measure
Run your hold-out set through the model and compare its answers with your outputs. If you have no outputs, have Opus label the inputs using the same class descriptions, and spot-check what it gives you.
EXPERIMENT_ID = exp["id"]

def classify(text, version="0.0.0"):
    r = requests.post(
        "https://api.withemissary.com/v1/classification",
        headers={"Content-Type": "application/json", "X-API-Key": os.environ["EMISSARY_API_KEY"]},
        json={"model": f"{EXPERIMENT_ID}/{version}", "input": text, "data_format": "probs"},
    ).json()
    probs = r["data"][0]["probs"]
    top = max(probs, key=probs.get)
    return top, probs[top]  # predicted class and its confidence

# Every call is logged; those logs are what you label and train on later
label, confidence = classify("I was charged twice this month")
3. Ship or train
Compare the hold-out score with your target, then take one of three paths:
- Ship if the score meets the target and fresh inputs confirm it. Deploy the version, pinned (see Deploy).
- Ship with a threshold if the model is accurate above some confidence level but not below it. Deploy, and send low-confidence answers to a person.
- Quick-train if the score misses the target:
- Look at the mistakes and name the patterns, such as "bare home addresses" or "placeholder SSNs".
- Generate a training set based on those mistakes. Aim for about half on the weak pattern and half near-misses from the class it gets confused with.
- Run it through the current version to label it.
- Manually label the disagreements: wherever the classifier's answer differs from the intended label, plus its low-confidence answers.
- Quick-train on those labels. You need at least 5, and it takes about 20 seconds. Use the UI or the API.
- Score the new version on the hold-out, and keep it only if it beats the old one. Then decide again: ship or train.
4. Repeat
Each quick-train makes a new version. Add inputs for the classes it gets wrong, plus near-misses from the class it confuses them with, label the mistakes, and train again until you hit the target.
label, confidence = classify("I was charged twice this month", version="0.0.1") # the version your quick-train returned
5. LoRA if it plateaus
When rounds stop improving the score, run a LoRA fine-tune.
- When to switch: three quick-train rounds in a row gain less than about 1 point, or make things worse. Quick-train only retrains the classification head, so once the base model's features stop separating your classes, more labels won't help. Also come straight here if one input can carry several labels.
- What it needs: at least 100 labeled examples per class, exported as JSONL (one prompt and its completion per line), plus your hold-out set as a separate test file. The loop above has already produced most of this.
- How it runs:
- Export your labeled logs to JSONL and upload them to a new project.
- Train on
Qwen3-8B(needed for serverless), then pick a checkpoint. A later one isn't always better, because the model can overfit. - Deploy to the serverless engine. Switch traffic only if it beats your best quick-train version on the hold-out set.
import os, requests
BASE, AUTH = "https://api.withemissary.com", {"X-API-Key": os.environ["EMISSARY_API_KEY"]}

# 1. Upload your labeled JSONL to a new project
pid = requests.post(f"{BASE}/v1/projects", headers=AUTH, json={"name": "my-lora"}).json()["id"]
ds = requests.post(f"{BASE}/v1/projects/{pid}/datasets", headers=AUTH,
                   files={"file": ("lora_train.jsonl", open("lora_train.jsonl", "rb"), "application/json")},
                   data={"name": "train"}).json()
# wait until the dataset is uploaded and profiled

# 2. Train on Qwen3-8B
job = requests.post(f"{BASE}/v1/projects/{pid}/training-jobs", headers=AUTH, json={
    "name": "my-lora-v1", "base_model": "Qwen3-8B", "task_type": "classification",
    "train_dataset_id": ds["id"], "train_test_split_ratio": 20}).json()
# wait until the job status is "Success", then pick a checkpoint

# 3. Deploy, then call it by its deployment name
requests.post(f"{BASE}/v1/engines/engine-qwen-3-8b-classification/deploy", headers=AUTH, json={
    "name": "my-lora-v1", "project_id": pid, "training_id": job["id"], "checkpoint": 3})
r = requests.post(f"{BASE}/v1/classification", headers=AUTH, json={
    "model": "my-lora-v1", "input": "I was charged twice", "data_format": "probs"}).json()
Deploy
Before you deploy, confirm the score on fresh inputs that were never used for training. Pick a confidence threshold from your hold-out results, and send anything below it to a person. Production calls are logged unless you turn on ZDR, so label the low-confidence ones every week or two and run another round. See Maintain your model.
Zero-shot and quick-train versions
Call the experiment as <experiment_id>/<version>. Pin the exact version, so a later quick-train doesn't change live behavior:
requests.post("https://api.withemissary.com/v1/classification",
    headers={"Content-Type": "application/json", "X-API-Key": API_KEY},
    json={"model": "<experiment_id>/<version>", "input": "I'm so mad!", "data_format": "probs"})
LoRA deployments
A LoRA model is deployed on its own, then called by its deployment name instead of an experiment version:
# Deploy a trained checkpoint to the serverless engine
dep = requests.post("https://api.withemissary.com/v1/engines/engine-qwen-3-8b-classification/deploy",
    headers={"X-API-Key": API_KEY},
    json={"name": "my-lora-v1", "project_id": pid, "training_id": job_id, "checkpoint": 3}).json()

# Wait until GET /v1/projects/{pid}/deployments/{dep['id']} shows "Deployed", then call it
requests.post("https://api.withemissary.com/v1/classification",
    headers={"Content-Type": "application/json", "X-API-Key": API_KEY},
    json={"model": "my-lora-v1", "input": "I'm so mad!", "data_format": "probs"})
The response has the same shape as a zero-shot call. To ship a newer LoRA model, deploy its checkpoint under a new name and point your calls at it.
Let Claude Code run it
Open For coding agents, copy it into Claude Code, then send this message:
Follow the guide above to build and improve a Decision LM for my use case.
Use case: <the decision the model makes, e.g. "route support emails to billing, bug or feature_request">
What I have: <nothing / inputs only / a few examples / 20+ inputs with outputs>
My data is in: <path to a CSV/JSONL file, or "none">
My hold-out set is in: <path, or "none">
My Emissary API key is in the EMISSARY_API_KEY environment variable.
Claude Code drafts the classes, gets Opus labels, and finds the inputs worth labeling. It stops to ask you before it creates the experiment, writes any label, trains, or deploys. It shows you the full class table and waits for your yes, then asks you to label the inputs it is unsure about, one at a time.